Documentation
An overview of Stride, how to install and use, theme options and examples, and more.
An overview of Stride, how to install and use, theme options and examples, and more.
We would like to thank you for purchasing Stride!
This documentation file helps you to understand the whole theme concept and how it works. You should read all sections of the file before start your work. Here have multiple detailed explain of elements, theme sections and included video tutorials.
If you have any questions that are beyond the scope of this help file, please check out and search for Forum page.
After that you still can't find the solution yet, please leave a ticket on Support system then support agents help your issue.
Surely you have already installed WordPress on your server. If you don't installed it yet and you are new to WP and have problems installing it, you might want to check out following tips.
You need to download theme files after you've purchased the it. Following image describes downloads section of the item and you have 2 download choices.
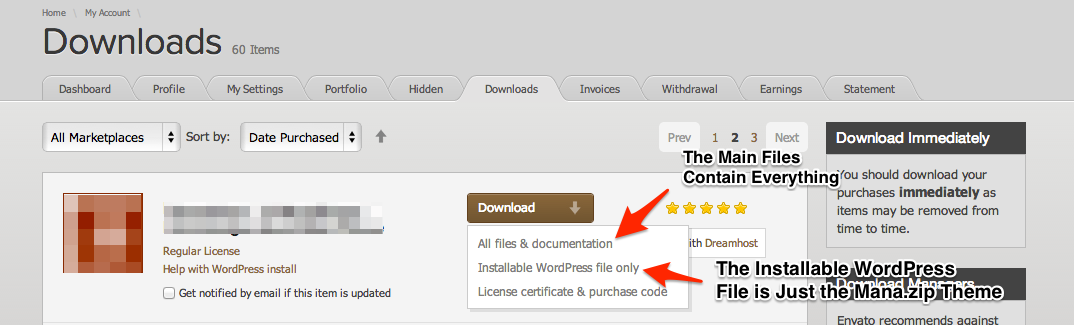
Downloading All Files gives you a all-files.zip file with all the content listed below
Downloading the installalable WordPress theme only gives you the Stride.zip file.
You can either choose to upload the theme via WordPress upload function or via ftp to your site.
Appearance -> ThemesInstall Themes tabStride.zip file (it is located in the folder you've downloaded from ThemeForest).Install Now button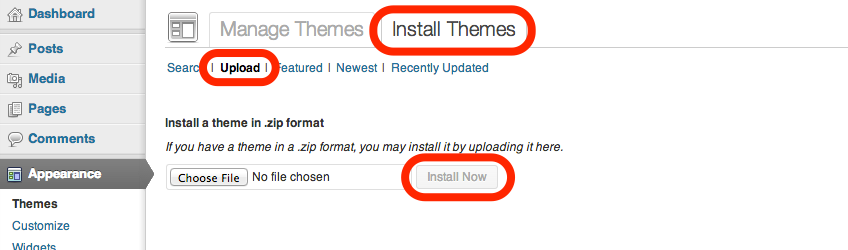
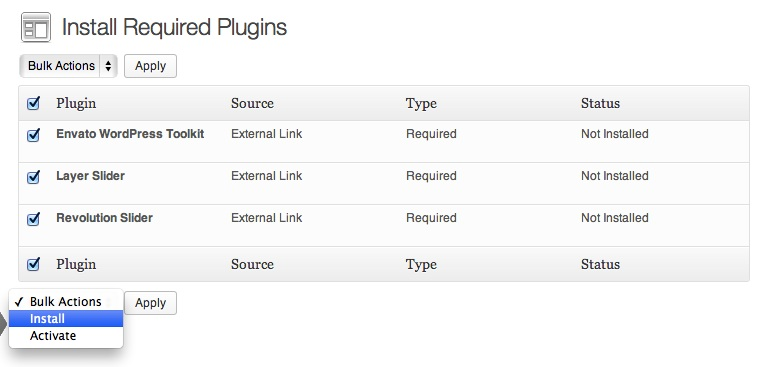
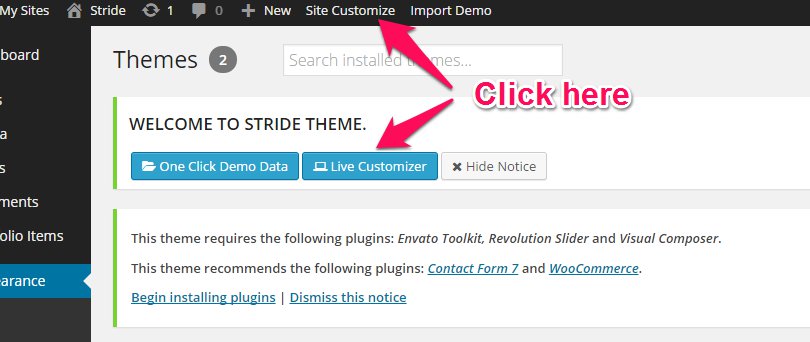
wp-content -> themes directoryAppearance -> Themes of your dashboard and Activate the theme.After the activation you see this notice at top of your dashboard. This theme requires those three additional plugins and you need to install those.
Please click on Begin insalling plugins.

Please select all plugins and select Install option on dropdown and finally click on Apply button.
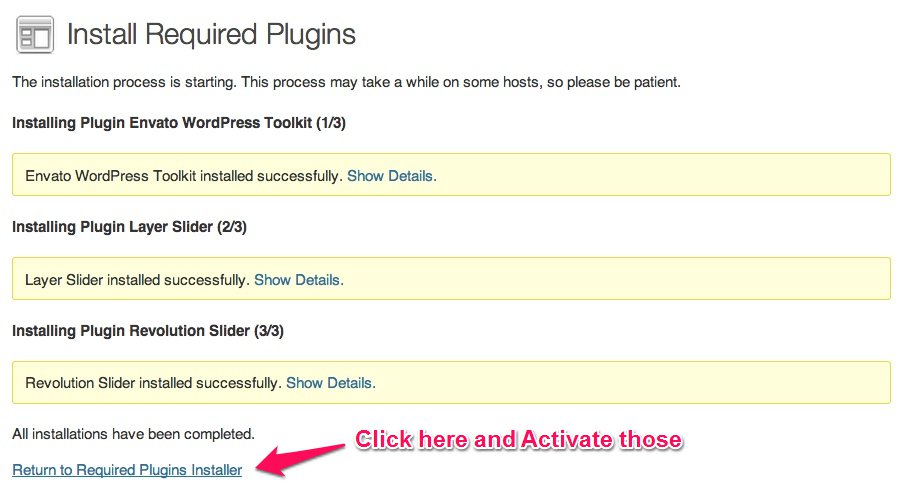
You will see this page after activated plugins.
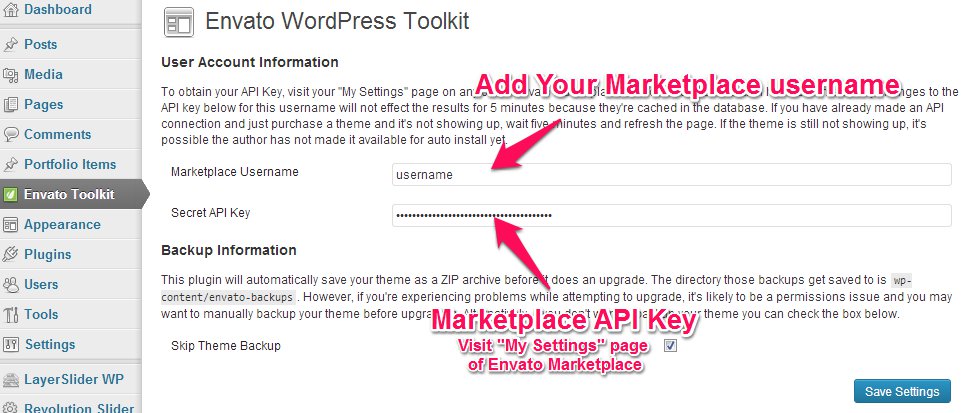
Envato Toolkit plugin requires MarketPlace username and API Key. You can get API key from your Settings tab of ThemeForest account. Lets provide those infomation and get theme update anytime and easily.
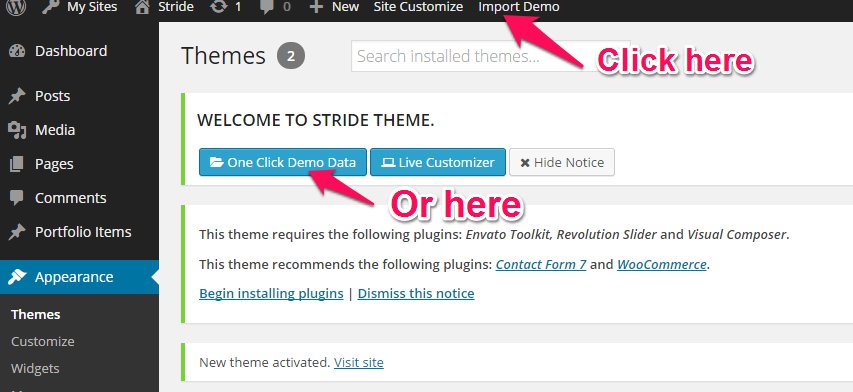
Theme has dedicated data option. You should click one of those link and select your desired home page layout. Action will set few important tasks including selection of Home page, Main navigation setting and Sidebar widgets when you click on Import Demo Data button.
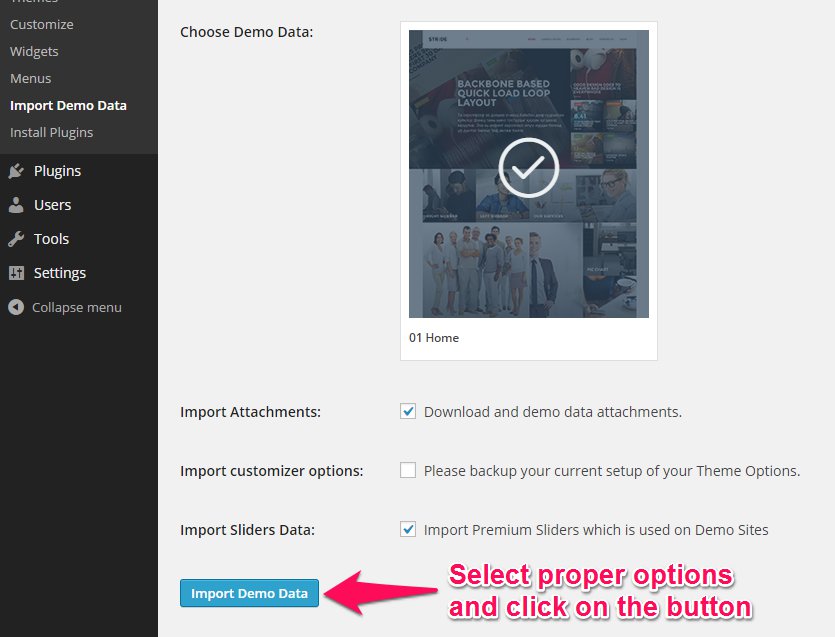
Please wait for a while until imports all the content.
Previous option helps you to include minimized demo content on your site reason for quick include. But you can have full demo data with regular XML data imports.
Please make sure you backup your existing theme folder before updating. Additionally we recommend performing the update on a development site before making it on your live site.
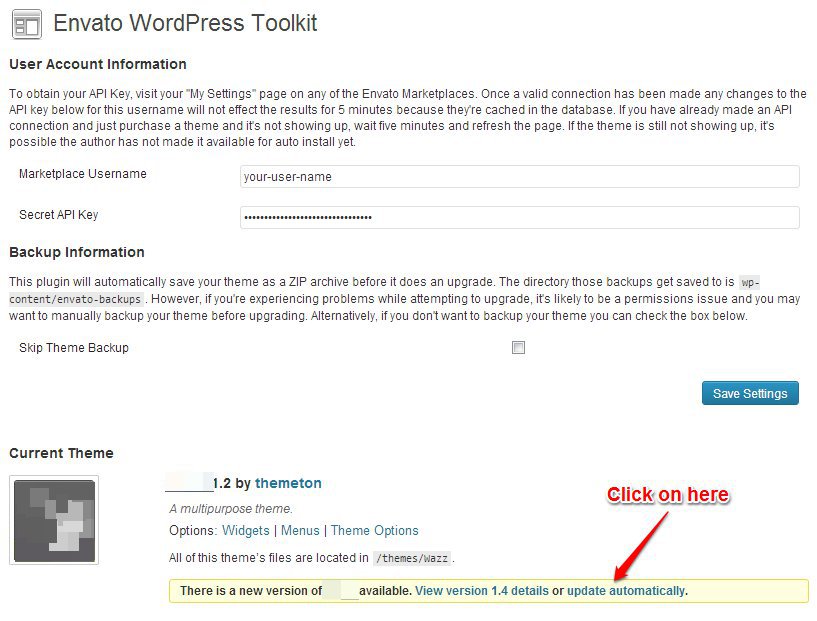
Hope you have provided your account information in Envato Toolkit plugin. If you go to the plugin page, you'll see similar to following image. Let's click on Update automatically link at right bottom. This is a most efficienat and easy way to integrate latest verion on your site.
After clicking to auto-update, you’ll see the confirmation that everything worked correctly.
Go to the Appearance => Themes and activate another theme than Stride such as TwentyTwelve, TwentyThirteen or Stride child theme. Delete the old version of the theme because folder name existing error comes up when we try to install it without deletion. Then install the theme again as you see early in this documentation.
Usually updating a theme means replacing the old files with the new ones. You can see changelog.txt file from the new download archive and you can get updated files list as modified/added and deleted. Upload and overwrite those files on your theme directory.
If theme changed lots of files and you really hard to collect changed files, there is a better way to do it when it comes to WordPress themes.
WordPress treats two version of the same theme as different themes. That is, if you have Stride v1.2 and v1.3 in your wp-content/themes folder they are treated as two different themes independent of each other.
That means you can have multiple version of the same theme installed on your blog. So whenever there is a new version of your theme available, instead of replacing or deleting the files of the older version follow this procedure.
The main advantage of following the above procedure is you can quickly switch back to the old version of the theme if you find any problems with the new version or if it clashes with any plugins you are using.
Live Customize panel has many options those help you to control your site. You have to know only where your desired options exist and how to use them. Please take some time to navigate through each tab and read option's description.
| Group | Class | Description |
|---|---|---|
General |
Primary color | The color that fills title background, link, link hover and pagination etc. But if the color doesn't fit for your area, you can set correct one at specific areas. Those customizations won't be overwritten by this. |
| Body Font | General font family options | |
| Body Background Color | ||
| Body Background Image | ||
| Left Background Image | This is an optional option and you can show different image on right side of your site with it. | |
| Responsive Option | Use Responsive design layout. | |
| Tracking Code | Add your Google Analytics or other tracking code here. This will be added into the footer of your site. | |
Logo | Logo Text Color | Unnecessary if you set logo image on following options |
| Logo Text Font | ||
Logo Image Options | ||
| Logo Image | Choose you logo image and see live result. If you think your logo image bigger at top, you can edit directly the image from media library popup. | |
| Logo Width | Don't you remember? Just click on your logo image and see the image details from media library. | |
| Logo Height | ||
| Retina Logo Image | x2 size of your original logo image. | |
| Favicon | 16x16, PNG/ICO/JPG | |
| Login Page Logo | up to 274x95px | |
Menu | Menu Font | |
| Sub Menu Font | ||
| Menu Color | Including search icon, socials links | |
| Menu Hover Color | ||
| Menu Active Color | ||
| Dropdown Background Color | ||
Areas | Header | |
| Header Height (px) | It increases header padding by difference between logo height and this value. But it doesn't show any result if you set lower value than logo height. | |
| Header Background Color | If you set darker value here, the function identifies and suggests automatic light color on header text and navigation links. But you can change them from Menu section if you wish. | |
| Search Box | Allows search box after the main navigation. | |
Title Area | ||
| Title Top Space | ||
| Title Bottom Space | ||
| Background Image | ||
| Title Background Color | The function suggests dark or light text color for title text depending on your selected color's brightness. But you can change it to desired color on next option. | |
| Page Title Color | ||
| Gradient Shadow | ||
Content | ||
| Content Background Color | The function suggests dark or light text color for text depending on your selected color's brightness. But you can change it to desired color on next options. | |
| Content Heading Color | H1-H6 tags and Post title | |
| Heading Font | H1-H6 tags and Post title | |
| Content Text Color | ||
| Content Link Color | ||
| Sidebar Heading Color | If you don't specify anything here, title are colored same as headings. | |
| Sidebar Heading Font | ||
Footer | ||
| Enable Footer | On/Off | |
| Sticky Footer | It is hard to reach at the bottom of your site and see footer area when you configured your page as Quick Load layout. Turn this ON for this case. | |
| Footer Columns | ||
| Background Image | ||
| Background Color | Sub Footer color is 10% darker than footer. | |
| Footer Heading color | ||
| Footer Title Font | Widget title and H1-H6 tags. | |
| Footer Text Color | ||
| Footer Link Color | 10% darker for Hover color | |
Sub Footer | ||
| Enable Sub Footer | On/Off | |
| Sticky Footer | ||
| Sub Footer Type | Choose Content / Left Content + Right Menu / Left Menu + Right Content | |
| Sub footer content | You can add here some html code and make own design | |
| Go to Top anchor | On / Off | |
Post Types | Post Options | |
| Related Posts | On/Off | |
| Author Box | On/Off | |
| Post Comments | On/Off | |
| Next/Prev links | On/Off | |
Page Options | ||
| Author Box | On/Off | |
| Page Comment | On/Off | |
Portfolio Options | ||
| Portfolio Label | Use this field to rename your portfolio custom post type. | |
| Portfolio Slug | Changes the default slug for this post type. | |
| Related Posts | On/Off | |
| Comment | On/Off | |
| Next/Prev links | On/Off | |
| Portfolio Main Page | Please select here main portfolio page. It's important for your breadcrumb. | |
| Portfolio Sidebar | You can set here default portfolio sidebar area. | |
WooCommerce | ||
| Shop Page Layout | ||
| Product Page Layout | ||
| Overlay Transition | ||
| Shop Page Sidebar | ||
| Product Page Sidebar | ||
Share Buttons | ||
| On/Off | ||
| On/Off | ||
| Google+ | On/Off | |
| On/Off | ||
| On Posts | On/Off | |
| On Pages | On/Off | |
| On Portfolio | On/Off | |
| On Products | On/Off | |
Extras | Export/Import | |
Custom CSS / JS | ||
Widgets | You can add your widgets here. |
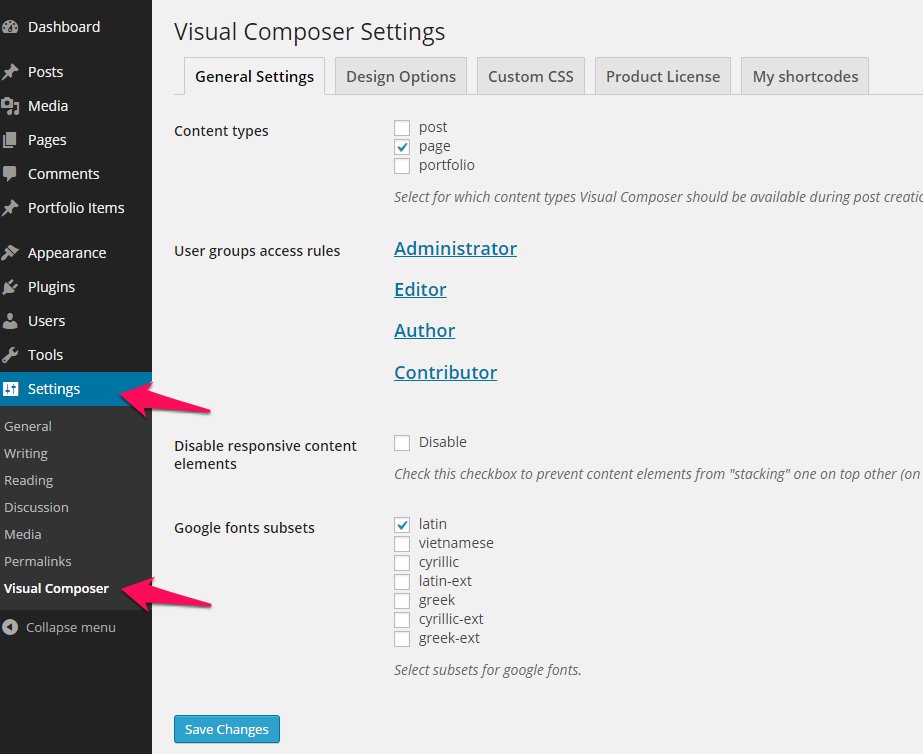
After the installation, you can configure something on following place for Visual Composer
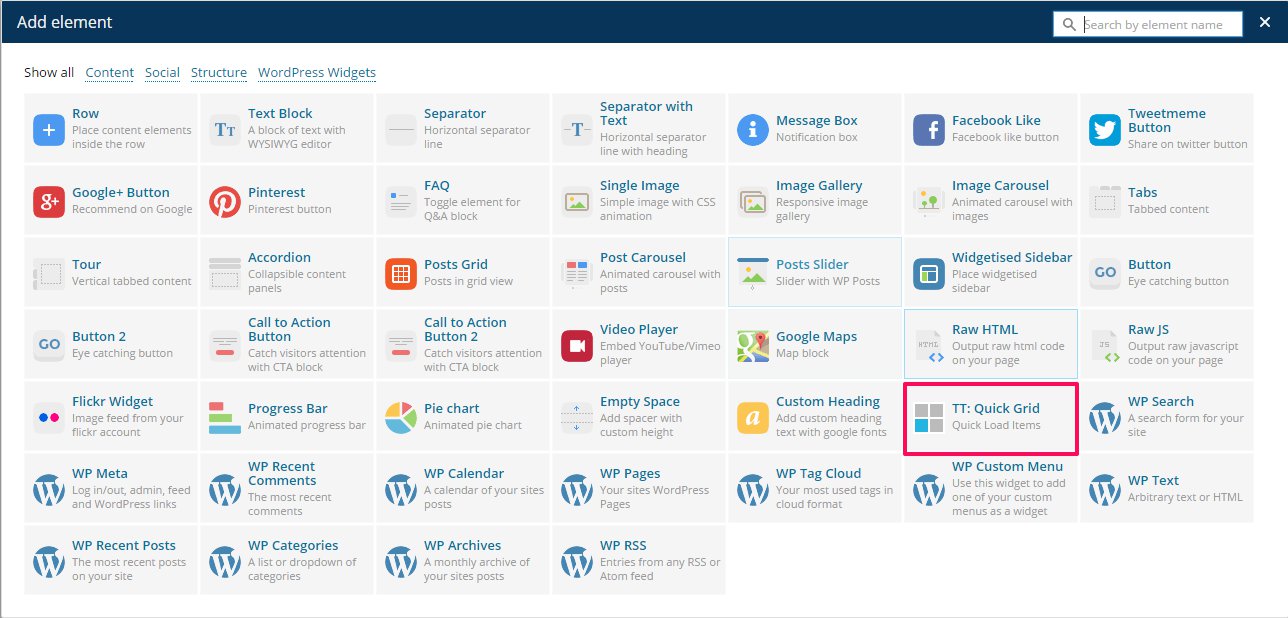
You don't need to do hard things for achieving Quick Load Grid style. Please just go over Visual Composer and insert TT: QuickGrid element. This element built in standard of VC element and you can use it on any part of your site. But of course you should make sure and don't insert it into small width of area because it doesn't look good on narraw space :)
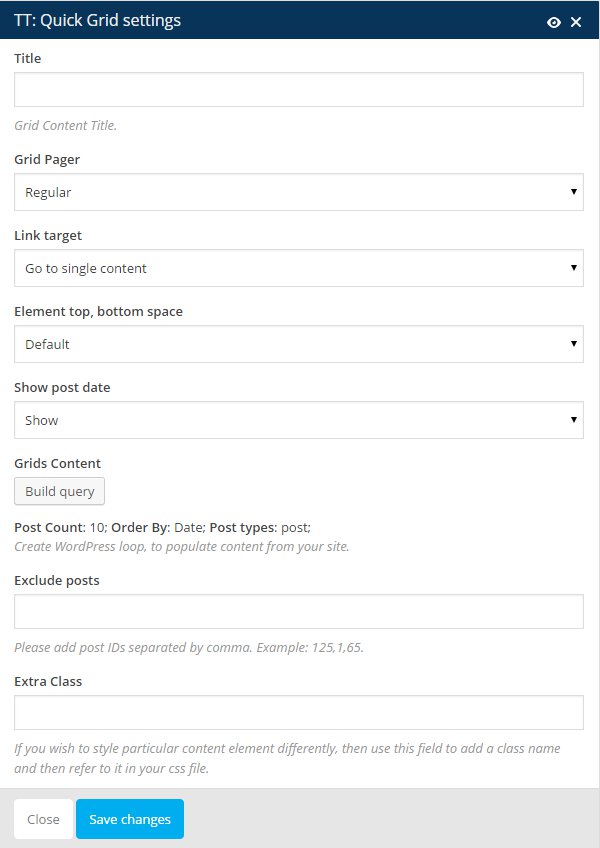
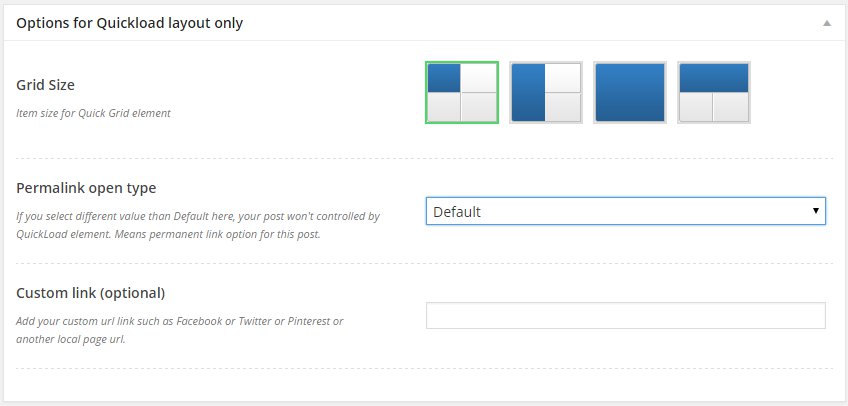
You don't need to setup much options on posts for the layout. But please set following Grid Size, Permalink type, Custom Link options for all your post types including Posts, Pages, Portfolio and WooCommerce.
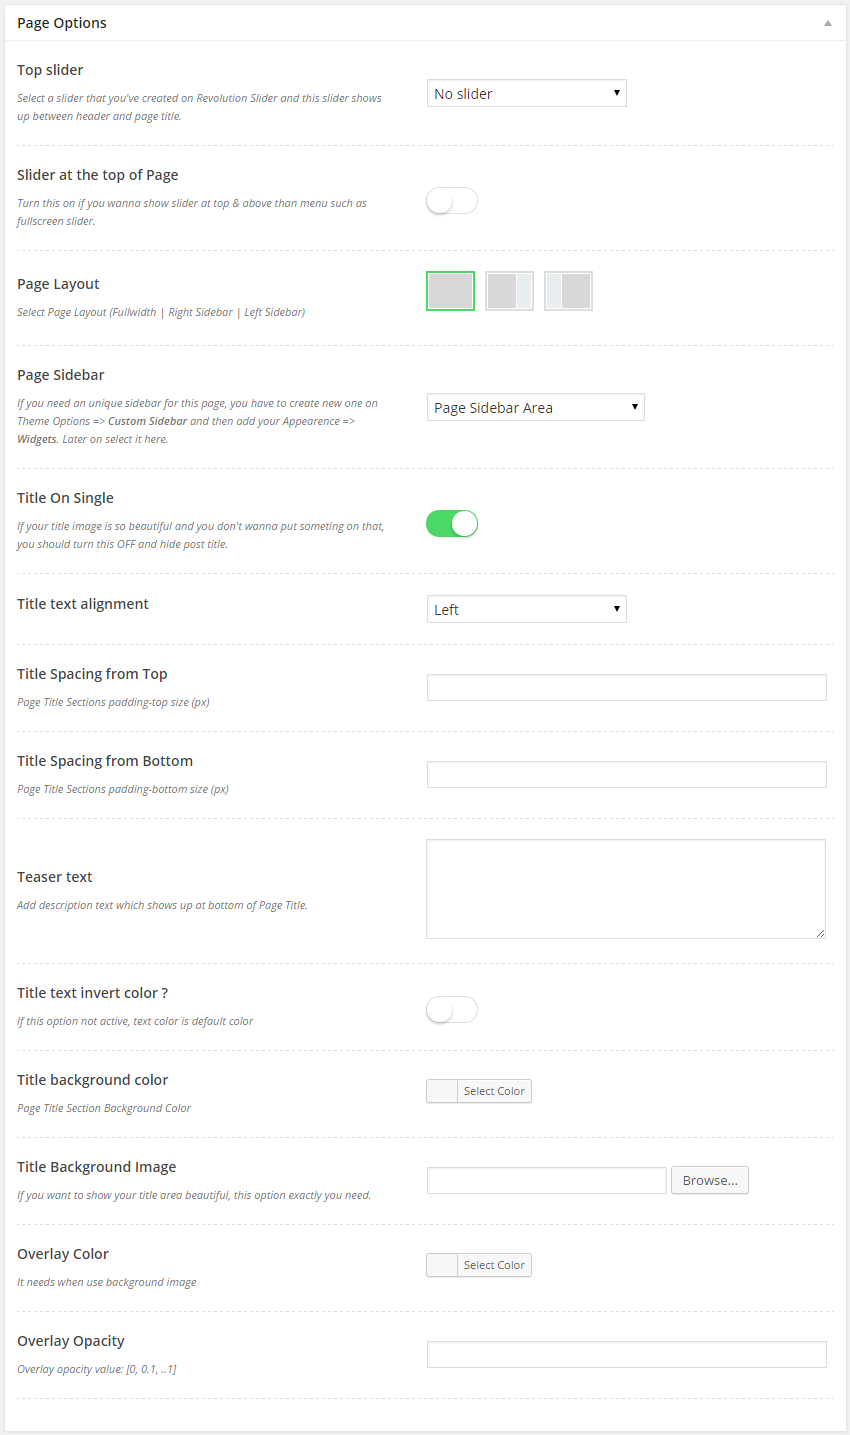
You'll find Page options at bottom of your main editor. Then you can control your page with that. Please read the option name and description and use them :)
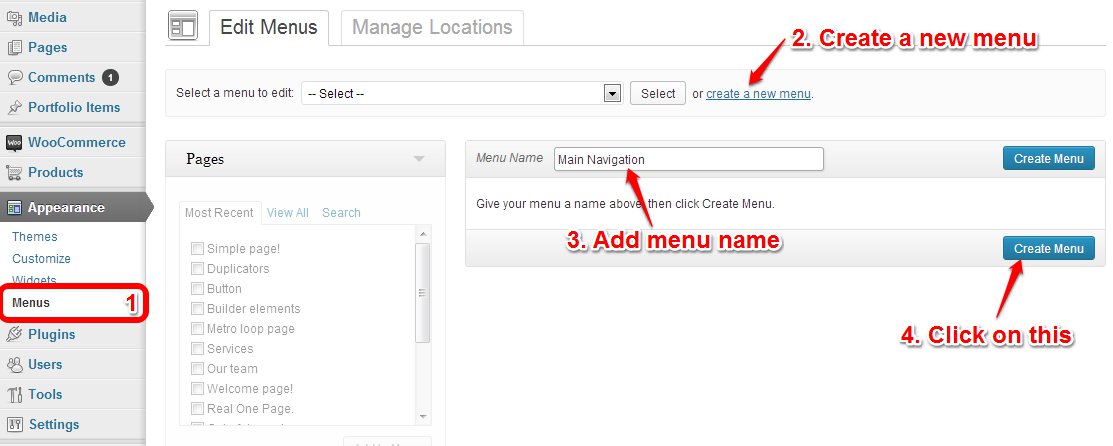
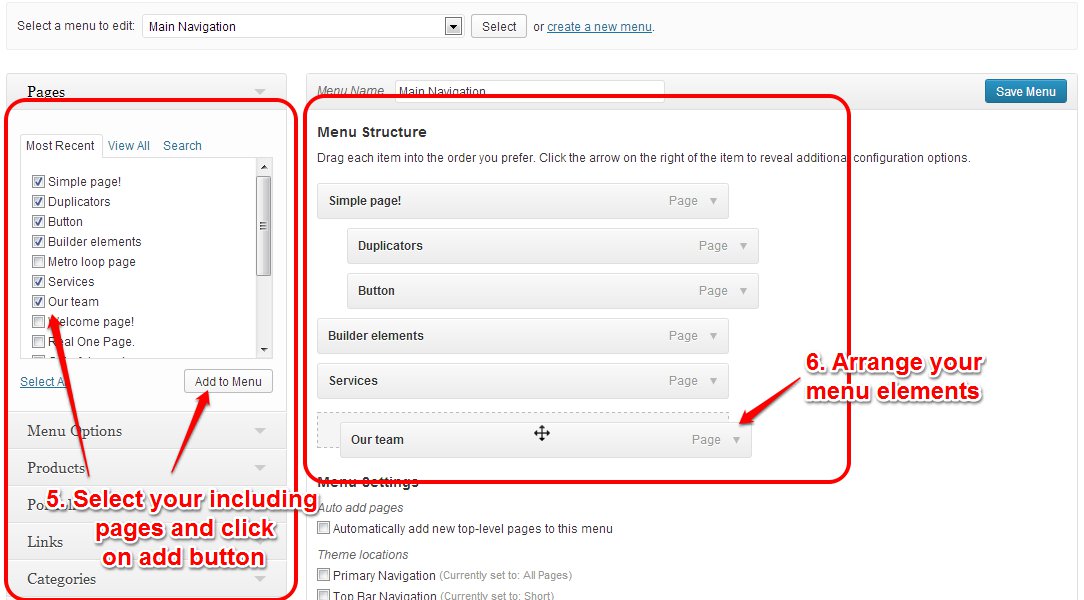
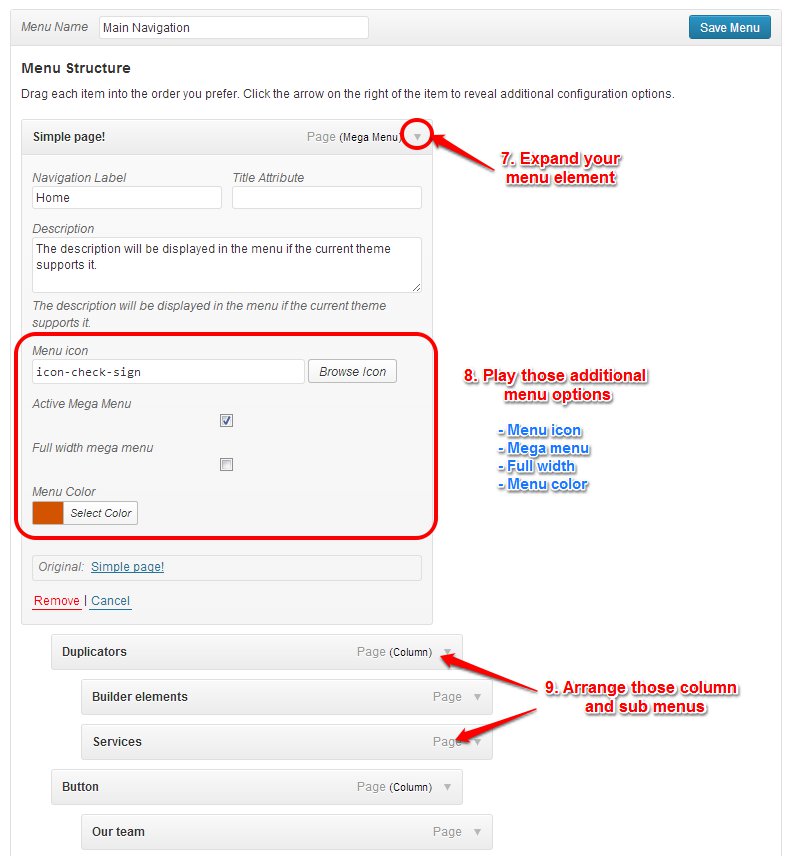
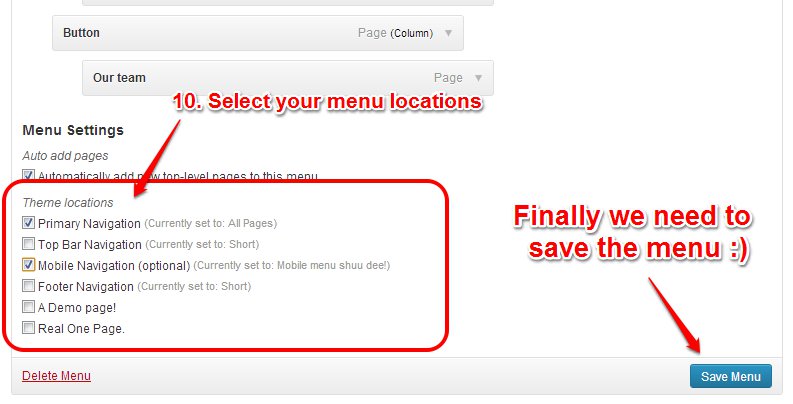
Menu system works through WordPress core functions. Then I hope you don't have any trouble with it. We extended menu options with a few options such as Menu Icon and Mega menu options. Please look at next images and follow the steps for your menu.
Automatic installation is the easiest option as WordPress handles the file transfers itself and you don’t even need to leave your web browser. To do an automatic install of WooCommerce log in to your WordPress admin panel and go to: Plugins > Add New.
In the search field type “WooCommerce” and click Search Plugins. Once you’ve found the plugin you can view details about it such as the the point release, rating and description. Most importantly of course, you can install it by simply clicking Install Now. After clicking that link you will be asked if you’re sure you want to install the plugin. Click “yes” and WordPress will automatically complete the installation.
It’s possible at this stage that you will be taken to a page requesting the FTP details of your webserver. This will be the case if you’ve not installed a plugin on this particular installation of WordPress before. If so, simply fill in your details to complete the installation.
The manual installation involves downloading the plugin and uploading it to your webserver via your favourite FTP application.
After you’ve installed and activated the plugin, be sure to select ‘Install WooCommerce Pages‘ to get started.

If you need more detailed documentation of WooCommerce usage, you should visit this link and get your information.
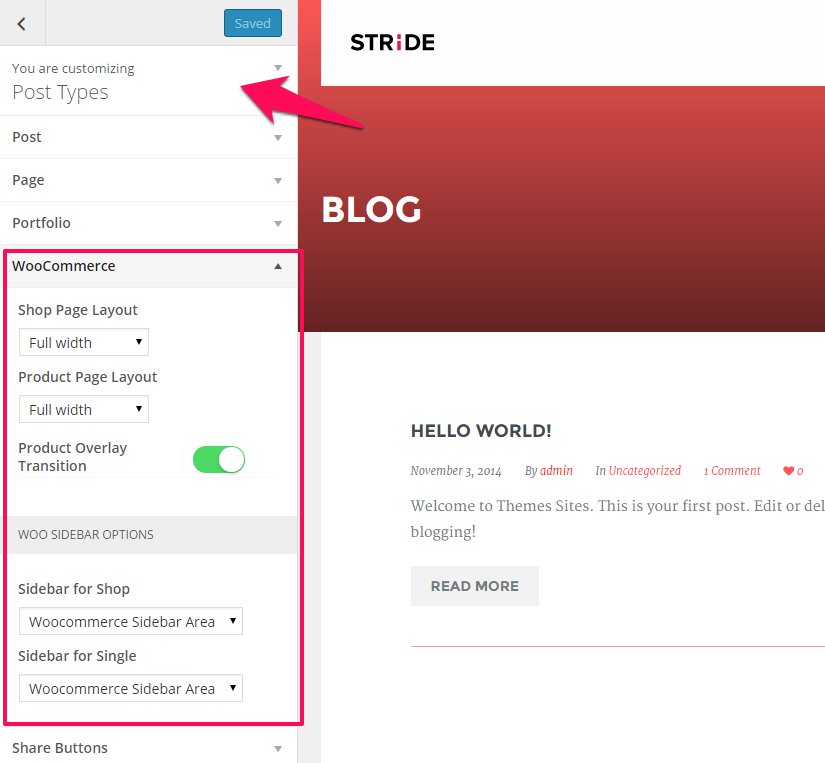
You can control some options from Live Customize => Post Types => WooCommerce
Thank you all of you guys for your amazing works. We always appreciated for you!
Open source projects
Licensed projects
jQuery & Plugins